Friday, September 25, 2015

Paneer Burji Quesadilla / Paneer Crumble Quesadilla


I recently had a friend over for lunch who just wanted to just hang out with me catching up on gossip and things. When I asked her what I can cook for her, she said  as usual, " don't worry, we can order some sandwiches!". I had some paneer that I bought from Indian store recently and I thought making a grilled paneer sandwich. But, Once my friend was here, we were busy chatting and completely forgot about the grilling part.

I ended up making a paneer burji and put it inside a flour tortilla and made it as a quesadilla. I served with some curried carrot and butter nut squash soup. My friend said the food was " out of the world". I made the same for my kids after school snack and they loved it. My daughter who does not eat cheese, ate a whole quesadilla with out any squeak!


It is so easy to put together and you can try this and see.


Get Ready


  • Store brought paneer 3/4 pack, crumbled with hands. ( use a food processor if you have one)
  • 1/2 white onion very finely chopped
  • Lots of cilantro, i did not measure it
  • 1/2 tsp red chilli powder
  • 1/2 tsp cumin powder
  • 1/4 tsp garam masala powder
  • 1/2 tsp salt or to taste
  • finely chopped green chillies ( optional)
  • Grated ginger ( optional)
  • Mission Flour tortillas medium sized
  • olive oil to to cook the quesadillas

Go:

  • In a bowl add the crumbled paneer, chopped onions, cilantro, all masalas and salt. combine them all well and set aside.


  • Take a tortilla, spoon the mixture on one side of the tortilla. fold the tortilla over.

  • You can cook them immediately or assemble them, cover with a damp cloth and refrigerate.
  • In a  hot skillet, add a little oil and place the folded tortilla. Cook till golden and flip the other side.
  • Cook till golden on both sides.


  • Cut into any shape you want and serve with ketchup, sour cream or even a mint chutney
Variation

I used the same filling inside  bread and made them as bread rolls for he kids. Cut the edges of the bread out. With the rolling pin, roll the bread nice and flat. Spoon the paneer burji filling inside. Roll the bread tight and apply a little water to the edge and press down. Apply some butter on the bread and cook a tawa, seam side down first till golden and crispy.


Add caption


A perfect school lunch, after school snack or quick week night dinner. if you don't have tortillas, one can also use left over chapathi's.

Try this out and tell me if you and your family likes it.

Thursday, September 17, 2015

Cauliflower Paratha / Gobi paratha


I recently found this pack of "Riced Cauliflower" at Trader Joe's and immediately thought, " woe, that would be perfect to use in a paratha! And that is what I did and it came out so well and I saved some time grating or food processing the cauliflower. they are not expensive and only $1.99 at TJ! love TJ!<3 p="">

If you don't get the riced cauliflower, just wash, clean the florets of cauliflower and grate them. Don't include the stem, save it and use it in a soup.


My kids loved them and they are perfect for breakfast, dinner or school lunches.


Get Ready ( makes about 8-9 parathas)

 For the filling


  • 2 cups riced/ grated cauliflower
  • 1 tbsp grated ginger
  • 1/4 tsp turmeric powder
  • 1/2 tsp red chilli powder
  • 1/2 tsp sambar powder
  • 1/4 cup chopped cilantro and (optional) mint leaves
  • salt to taste
  • oil/ ghee to cook parathas


For the outer covering


  • 1 cup atta/ wheat flower
  • a pinch of salt
  • 1 cup warm water
  • oil to rub


Go


  • Make the dough, cover it with a wet cloth or saran wrap and set aside.

  • Next, let us make the filling.

  • In a dry pan, add the riced cauliflower, grated ginger, turmeric, chili powder, sambar powder salt and fry them till all the moisture evaporates.
  • Add cilantro, chopped mint and set aside for it cool completely. This is very important as you don't want the stiffing to be warm and it will be hard to roll the parathas.


  • Take a lemon sized ball of the dough, make a small disc. Take a small key lime sized filling.
  • Add the stuffing inside and pull the edges in a pleated fashion to close. Make  the ball smooth, and flatten the dough with your palm.


  • Dust a surface and gently, I mean very gently roll the paratha.
  • You can also do the second method, which is much easier by making 2 discs out of the dough. spread the filling on the first one, cover with the second disc, seal the edges and roll. This method makes less mess and reduces the chance of filling seeping out.
  • Heat the tawa, and add the rolled paratha. Once you see small bubbles on the surface of the paratha, flip them over.

  •  Add little oil or ghee and cook the parathas till golden on both sides.


Serve hot with raita, yougurt or pickle. My kids love to eat them with ketchup!


Variations:

Add cumin, dhania powder,or green chilli according to your taste for the filling.

Thursday, September 10, 2015

Crispy Onion Rava Dosa ( Restaurant Style)


Here is a very simple and easy recipe for a crispy, hotel style Onion rava dosai. We recently were in London and my daughter loved the onion rava doasi served at Hotel Saravana Bhavan. We ate there 4 times during our stay and every time, my little girl wanted to eat the same dosa. She does not care for chutney, sambar for dipping and is just happy with a little bit of rasam. I make this so often and was actually surprised that I had blogged about it before.

So, Here is the recipe. Use equal measure of rice flour and rava and 1/2 measure of maida or all purpose flour. The other ingredients are all per taste and you can tweak it the way you want. You don't have to soak the rava, rice flour in any thing. It so happened to me that, I made the batter and let it sit for 30 mins before making dosa.

This dosa cannot be spread the same way as regular dosa. Since the batter will be watery, you have to pour it in a circle on a hot tawa slowly from the outside and then slowly fill up the insides.


Get Ready ( makes 10- 15 dosa)


  • 1 cup Rice flour
  • 1 cup Rava/ sooji
  • 1/2 cup All purpose flour/ maida
  • 1 cup butter milk
  • 2 tsp jeera/ cumin seeds
  • 1 tsp black pepper corn/ milagu
  • 3.5 - 4 cups of water (add more as needed)
  • salt to taste
  • 1 tsp grated ginger
  • Lots of curry leaves and chopped cilantro
  • 1 small onion  pretty finely chopped.
  • 2 small green chilly chopped ( optional)
  • oil to make dosa


Go:


  • In a bowl add all the flours, salt, jeera, pepper, grated ginger, curry leaves and cilantro.


  • Add butter milk, water and whisk them all well without any lumps. 

  • If you batter is going to sit for a while, make sure to whisk them all again as the rawa will sink at the bottom and the batter will thicken. Add more water so the batter is watery, but not too thin.

  • Add the chopped onions, salt to taste.
  • Heat your tawa or skillet. Sprinkle some water on the tawa to make sure it is pretty hot. The water should sizzle right away.
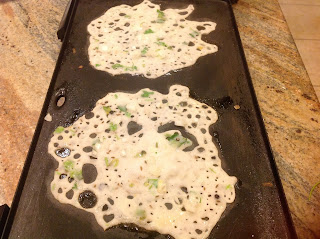
  • Pour the batter first forming a outer circle and gradually fill up the inside. It should looks lacy with lots of holes.  I used a rectangular skillet and hence all weird geographic shapes !


  • Add oil and a little bit of ghee for the dosa to cook till brown and crispy. One does not have to flip them to the other side, but you can if you want to.
  • Serve hot with chutney, sambar or molagapodi. I served with Almond chutney which can be found here !

Enjoy the crispy onion rava dosa without counting how many you eat! They taste so good piping hot!